A DIVE INTO 16TH CENTURY CROSS STITCH; A RECREATION OF THE DATE PALM
QUEENS PRIZE/ A&S FAIRE 2024

PROJECT BRIEF
From 1568-1587 Queen
Mary of Scotland was held captive in England. During those years she, along
with Elizabeth of Shrewsbury, created dozens of cross stitched pieces, to pass
the time, decorate the castle in finery and to pass on messages (at least on the
part of Mary)

WHY THIS PROJECT?
I have had an
obsession with these creations as well as table carpets for a very long time. I
felt that this project was a good place to start. Using a fabric I have used
before (double woven cotton) as well as a thread I am not as skilled in (wool)
this became a good challenge of my skills and knowledge
AVAILABLE RESOURCES
While the
original purpose is not known, it is
believed that these slips were given as gifts, and used as functional items
prior to being turned into their current hangings. The hangings were created by
Alathea Talbot in the 17th century.
MARIAN HANGING
Currently in Oxburgh hall, England
8 octagonal shapes and 28 cross shaped pieces (slips)
Believed to be made by Mary and her household (cipher present)

The Oxburgh Hangings – Agnes Ashe (wordpress.com)
SHREWSBURY HANGINGS
Mostly made by Bess Talbot (believed due to her ciper being
present) and household
4 octogonal panels and 20 cross shaped panels

CAVENDISH HANGING

The Oxburgh Hangings – Agnes Ashe
(wordpress.com)
Bess’s second husband was the Earl of Cavendish
4 Octogonal and 22 Cross shaped slips
Created by Bess, Mary and household
PATTERN BOOKS
A professional Tapissiers, either
employed by the household or a traveler who would be employed on a project to
project bases then move onto another commission, would take the designs picked
by the household, pounce it onto the fabric and sometimes would outline it
before giving it over to be embroidered by the embroider.
With the printing press becoming a more commonly employed tool, pattern books were more and more popular the mid 1500’s had such books circulating such as Gesners “Birds of Paradise”, “La Nature et Diversite des Poissons” P. Belons “L’Histoire de la Nature des Oyseaux”, as well as many others. My understanding is these books are not in their original bindings, but the University of Edinburgh does have several plates as well as in the V&A museum collection. “A Schole House for the Needle” which is a collection of patterns from 1632 put together by John and Elizabeth Mason is probably the closest we can come to what a pattern book might have looked like

“May Queen of Scots” by Margaret Swain

“A Schoole-House for
the Needle”
For my project, I used the pattern that was graphed in “A Treasury
of Embroidery Designs” by Gill Speirs and Sigrid Quemby. In the Back of “A
Schoole- House” they do have the pouncing paper that would have been used
historically. I followed the graph already present.

MATERIALS AND METHODS
Stitches used (definitions from royal school of
needlework)
Cross stitch Cross stitch consists of two
straight, crossing stitches which can be worked individually or in rows
(English vs Danish).
Tent stitch Tent stitch is a diagonal stitch,
usually worked across a single intersection of canvas from bottom left to top
right.
Basketweave tent stitch worked in diagonal rows,
either from the top right-hand corner down, or from the bottom left-hand corner
up…
Examination of the
contemporaneous Hardwick Hall embroideries has found that both basketweave and
(trammed) half cross tent stitches were used.
PETIT
POINT/ GROS POINT tent stitch to be worked over a single thread (which is called petit
point) or over two warp and two weft threads (gros point)
While my
grandmother taught me English style cross stitch in the 90’s, the depictions in
my books show the Danish method being the style used in the 16th
century.
Historical canvas was densely woven (43
stitches per inch was not uncommon) linen. I used a double woven 14 count
cotton canvas for my base as this is a material I have used several times
before and I wanted something I am comfortable with for this project. Haptic
and Hue spoke on Mary Queen of Scots and her creation and shared on their
facebook page this wonderful close up on the ground fabric that was used.

I did use tapestry wool for the thread, which is something I am not
as skilled with and this was the perfect project for me to start with. I have
used silk before, however I feel uncomfortable using silk for moral reasons.
Metal threads are also present in some of these creations, although this is
also a skill I need to work on and was a choice to not use in this recreation

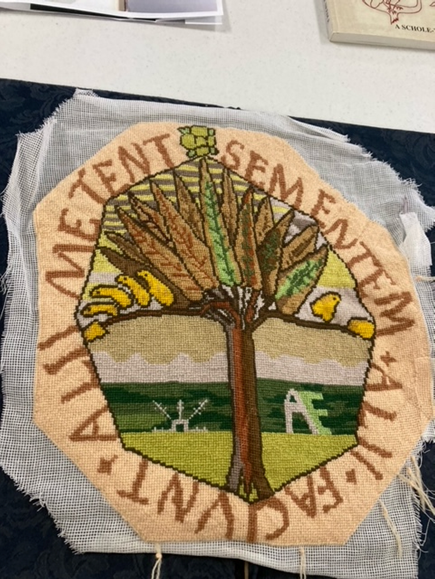
It is traditionally recommended you start in the center of your project and work your way out to prevent spacing issues towards the end. However I decided to work from the top down for the outline and then fill in the center for spacing issues. I have not attempted lettering of this type up and till this point, I wanted to make sure to get that aligned as well as having the leave spacing the best I could.

Unfortunately the bookmaker made the decision to put the pattern right in the book fold, and did not put stitch allowance for this occurrence, which caused me difficulty in the outline. I then worked the rest of the outline from the left and all the way around as well as filling in the tree till I got to that point. Then I went stitch by stich from both the top and bottom to try to get that angle to line up the best I could.

It did cause
alignment issues for the “E” as well as the “M” in that area, however not
elongating the “M” I believe was the right answer to prevent letter crowding

I also wanted to include a demi-escarbunce as not only part of Kingdom heraldry, but also to give the illusion of a rising sun and turn the ES into AE which is my initials (Ashley Elizabeth). Because of these choice, I also decided to eliminate the lower branches of the tree to allow extra space to draw your eyes to those elements. Following the pattern, I attempted to keep the colors and background design as close as I could. Something I found interesting while looking at this pattern constantly for many days, is that the color palette shades are very much In the same shades compared to the modern eye of wanting contrast in our projects.
For the colors of the leaves, I
followed the basics of the written pattern, as well as adding some of my own
color choices into the background. To my eye, the finished project in the book
versus the written pattern did not always line up, so I based some choices off
of the colored picture instead of the pattern

When I originally cut the fabric prior
to starting, I did leave myself enough extra fabric to prevent damage; however
at one point I felt like I had left too much and was in my way. Hastily
cutting, I thought I left enough to prevent sizing issues, but alas I cut too
short. I did sew in a small piece to allow the project to be finished, and
using tent stitch, I was able to hid that mistake fairly well. My plan with
this project is to have it professionally framed and hung in my living room by
my fireplace
SUGGESTIONS LEARNED FROM MY A&S
FAIRE/QUEENS PRIZE TOURNAMENT
Presenting this project was such an
exciting experience at Faire. I received some wonderful feedback to help
elevate my project to the next level.
·
KEEP ALL STITCHES IN THE SAME DIRECTION; previous
projects had a severe lean to them so I made the decision to turn the project
when filling in the space of the letters to help prevent that stress on the
fabric. When doing that though, it takes away from the overall look of the
project. Also, the historical pieces are all in the same direction (somewhat
like the lines of a typewriter) so that compensatory technique would more than
likely not been done historically.
·
USE A GRID SYSTEM ON THE FABRIC PRIOR TO EMBROIDERING
AS WELL AS ON YOUR PATTERN IF IT ISNT ALREADY THERE; cross stitch is a counted
work process, and while I did count while creating it, in some places my count
was off which did throw the alignment off in several places. I will try both a
drawn thread grid as well as a washable marker grid system to see what I prefer
and what works the best.
RESOURCES
The Oxburgh
Hangings – Agnes Ashe (wordpress.com)
A
Schole-House for the Needle by John and Elizabeth Mason
A
Treasury of Embroidery Designs by Gill Speirs and Sigrid Quemby
The
Needlework of Mary Queen of Scots by Margaret Swain


Comments
Post a Comment